AMI BIOS help and support
This page helps navigate through an AMI BIOS setup using illustrated graphics of the AMI BIOS and brief explanations of the navigation. Using this page gives users a better understanding of how to navigate, change values, and otherwise manipulate the AMI BIOS.
How is the AMI BIOS different?
- Tab key is used to navigate.
- Arrow keys change values.
- Values are automatically saved when changed, no need to save and exit like other BIOS setups.
Navigation information
At first glance, users may consider the AMI BIOS a difficult BIOS to use. However, after a few minutes, this setup can be changed using only a few keys.
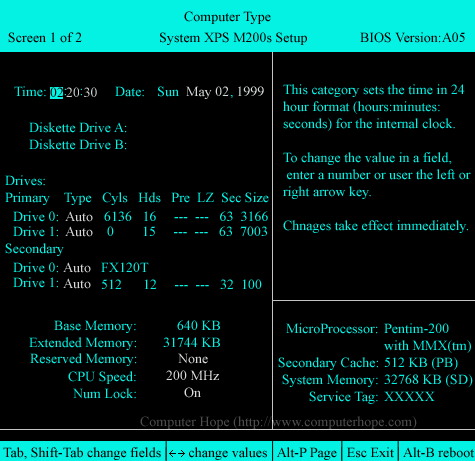
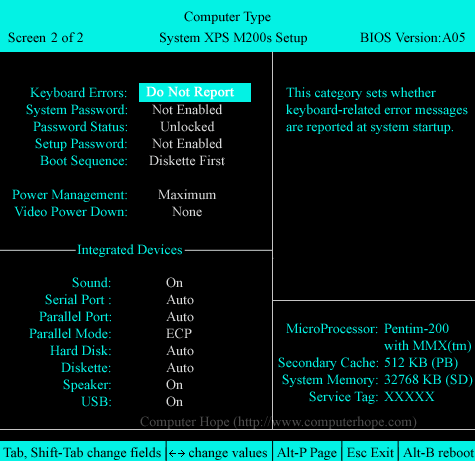
In the below BIOS screenshots, you see that all of the information is within two pages. Although this may make the pages look more complicated, it helps with locating values you may want to change.
To navigate the AMI BIOS, use Tab or Shift+Tab to move between each of the available options. When highlighted, a user can then change a value with the left or right arrow keys. If the main screen does not contain the settings you want to change, switch pages by pressing Alt+P. These keys are also printed at the bottom of the BIOS setup page.
If the help portion of the screen contains more information than the screen can show, press PgUp or PgDn to display the other pages of information.
Screenshots
Below are example illustrations of the AMI BIOS. As shown in the picture below, this BIOS screen is divided into three sections. The main left section is the area a user can define and change values. The top-right section describes the highlighted section, in the example below, the hour is highlighted and displaying how to change the time. The final bottom right section is a non-changeable section that gives additional information about the computer hardware.
Depending on the BIOS, version, and manufacturer of the computer or motherboard, you may have more or less options than what's shown below.
Main Screen Example

Second Screen Example

