How to remove or replace a laptop keyboard

Removing a keyboard on a laptop is not a simple task. Nearly all components in a laptop require more time or expertise to change than desktop components, including the keyboard. If you do not have experience disassembling a laptop, we recommend having a computer technician replace the keyboard for you. If you have the experience or insist on doing it yourself, review the information in the sections below for guidance.
Removing a laptop keyboard
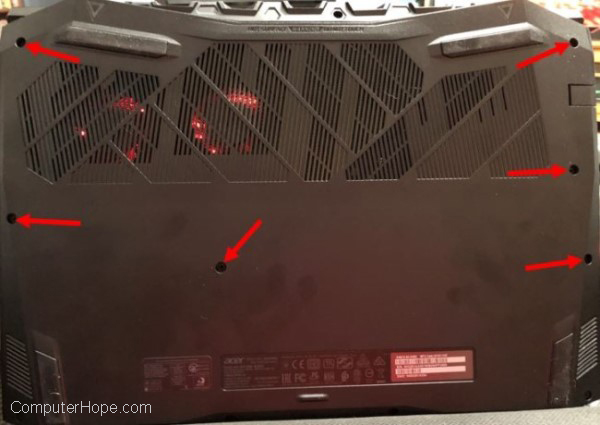
Remove screws on bottom of laptop
The first step is to remove some screws on the bottom of the laptop. Some laptops display a small keyboard icon next to the screws that needs to be removed. Other laptops don't have the keyboard icon, so look closely to find the appropriate screws. The screws on most laptops are recessed in the bottom of the casing and are circular holes. However, some laptops have rubber pieces that cover the screws. If you have that type of laptop, remove the rubber pieces to access them.

Once you find the screws, remove them and set them aside in a safe place so you don't lose them.
Remove keyboard or top part of laptop casing
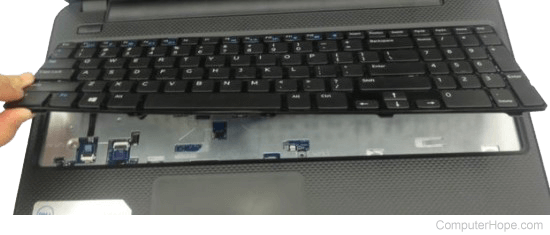
With the screws removed, turn the laptop over and open the lid to see the keyboard. Depending on your brand and model, you can remove the keyboard directly, or you may need to remove the top casing around the keyboard before proceeding.
First, try lifting the keyboard. You may need a small, flat-head screwdriver to raise the edges. If you cannot access the edges of the keyboard because the casing prevents it, remove the casing (as we mentioned above). If you can lift the keyboard out, skip to the section about disconnecting the laptop cable.

To remove the keyboard casing, start around the laptop edge and find a seam between the casing around the keyboard and the bottom casing. Carefully lift on the top section to pop it loose from the laptop. Be gentle to avoid cracking the casing, while still applying enough force to lift and remove it. Also, be aware of any plastic tabs used to secure the case so that you don't damage them.
The exact method needed to remove the casing differs by laptop brand and model, so check your owner's manual for specific steps.
Remove keyboard screws and keyboard
With the laptop casing around the keyboard removed, locate any screws that secure the keyboard in place from the top. Although there may be more, in most cases, there are three to five screws, if any. If you don't find any screws, skip to the next section.
Remove the keyboard screws and set them aside in a safe place, so you don't lose them. Then, lift the keyboard up from the rest of the laptop.
Disconnect keyboard cable
With the keyboard lifted up, disconnect the cable that connects the keyboard to the motherboard. Use caution; carefully disconnect the cable from the motherboard by pulling gently.

After disconnecting the keyboard cable, set the keyboard aside.
Install new laptop keyboard
Connect keyboard cable
First, connect the keyboard's cable to the motherboard by carefully inserting the cable into the connector. Apply mild pressure until it is secured in place.

Place keyboard in the laptop case
After connecting the keyboard ribbon cable, insert the keyboard into the case. The most common method requires you to insert the top or bottom edge of the keyboard first. The edge may snap into place or line up with metal tabs that help secure the keyboard. Then, insert and snap the other edge of the keyboard in place or line up the metal tabs.

Add screws to secure the keyboard
If you removed screws that secured the keyboard in place, screw them back into the keyboard. Otherwise, skip to the next section.
Attach top casing around the keyboard
If you removed the casing around the keyboard, carefully reattach it, snapping into place where applicable. Use gentle pressure to attach the casing to avoid cracking or breaking it.
Add screws to bottom of laptop
Lastly, put the screws back in the bottom of the laptop casing. Make sure the same number of screws are put back in place as were originally removed. Do not over-tighten the screws.

