How to adjust a monitor using the front buttons
Unfortunately, all monitors and flat-panel displays are different. There is no universal button system or set of instructions we could give you to configure your monitor using the buttons on the front. By far, the best method of determining what each of the buttons do would be to consult your monitor owner's manual. If you have misplaced your monitor documentation, you can search the Internet for the model name or number of the monitor to obtain it.
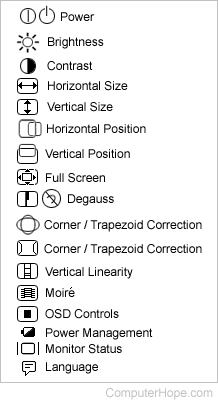
For general reference, we created the following chart to help illustrate what many of the buttons and icons associated with them do. Below is general information on the likely monitor controls on your monitor. Using these controls, you can improve the quality and layout of the picture on your monitor for better viewing. Realize that not all monitors have all of the following buttons. Furthermore, with many monitors, you must press a button to access a menu before seeing any of the following options.
The names of the monitor icons can differ between brands and types of monitors. If you don't see the same icon names, look for icons with names similar to those shown in the chart below.
If a monitor has no more than two physical buttons on the front of it, is likely configured through software.
If there are no buttons on the front of the monitor, check on the bottom and top edge. If no buttons are found, the monitor may utilize touch-sensitive buttons instead of push buttons. Touch-sensitive buttons are often found on the front, bottom edge.
| Monitor Icon | Description of icon function |
|---|---|
 |
Power - Turns the monitor on or off. Brightness - Using this button or wheel the user can increase and decrease the brightness on the screen. Contrast - Using this button or wheel can increase and decrease the amount of contrast on the screen. Horizontal Size - Allows for the picture on the screen to be stretched to the horizontal edge of the monitor. Vertical Size - Allows the picture on the screen to be stretched to the vertical edges of the monitor. Horizontal Position - Allows the picture to move moved horizontally. Once in the center, use the Horizontal Size to stretch it to have an equal amount of black border on each side. Vertical Position - Like the Horizontal Position, using this button or wheel the user can move the picture up or down to center the picture more appropriately. FullScreen - Sets monitor to fullscreen. Degauss - This button will degauss the CRT (Cathode Ray Tube), restoring possible color impurities. After this button is pressed, the degaussing circuit will be activated and then deactivated after a few seconds. Pressing and holding this button for a few seconds may cause your computer monitor to reset all data. Corner and Trapezoid Correction - Using this button or wheel the user can either round the edges of the picture or move the picture inward like an hourglass or outwards. Vertical Linearity - Sets the width of the vertical lines. Moire - Removes or reduces the Moire effect, if any. OSD Controls - If the monitor contains OSD (On-Screen Display) controls for the OSD menus to be adjusted. Power Management - Allows the user to define the power management settings through the monitor itself and not the software. Monitor Status - Displays the current monitor settings such as refresh rate and other settings. Language - Sets the language on the monitor. |
