How to make a time-lapse video in iMovie and Premiere Pro
There are multiple ways to make a time-lapse video, from piecing together several photos or using existing video footage. There are also multiple programs to use for making a time-lapse video. On this page, we walk through the basic steps of using still photos and video footage in Apple iMovie and Adobe Premiere Pro. These steps do not include how to take the pictures or videos for the time-lapse. For these steps, we assume you already have the footage.
To make a time-lapse video, you need access to video editing software, like iMovie or Premiere Pro.
To take photos for a time-lapse video, you either need patience or preferably a camera trigger or intervalometer capable of setting a time delay. Having a trigger lets you set the camera on a tripod, hook up the trigger, and leave connected during the time-lapse. Finally, know that most time-lapse videos are 24-30 frames per second.
Time-lapse video using photos in iMovie

To make a time lapse video using photos in iMovie, follow the steps below.
- Open iMovie.
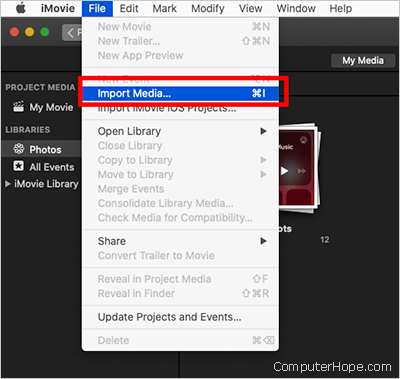
- Click File in the menu bar.
- Select Import Media.
- Select the location of the photos, and select the folder containing the photos. Select all photos by clicking and dragging a box around them, or click the first photo, hold down Shift, and click the last image.
- Click Import Selected.
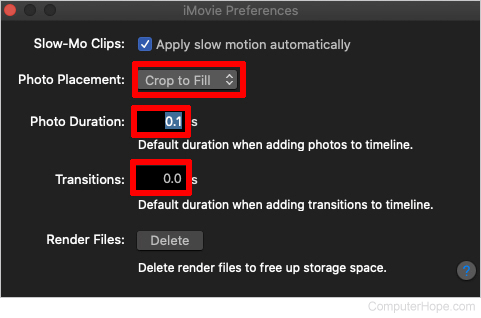
- At the top-left of the screen, click iMovie, then Preferences.
- Change the photo duration to the time frame desired, commonly about 0.1 to 0.5 seconds, depending on how long you want the photo to show.
- Change the Photo Placement to Fit.
- Make sure the Transitions are 0.0 seconds unless you want transitions between the pictures.
- Click the red X at the top-left of the screen to save and exit this window.
- Click-and-drag the group of photos into the timeline below.
- While the photos are still selected, in the top-right of the screen, make any adjustments you need by cropping or using the color balance features.
- Press Play to start the time-lapse. At this point, the video is ten frames per second.
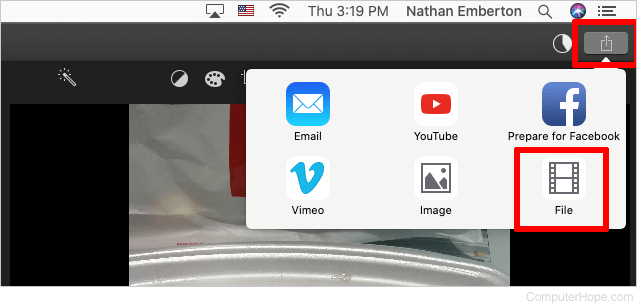
- To save the video, at the top-right of the screen, click the Share icon.
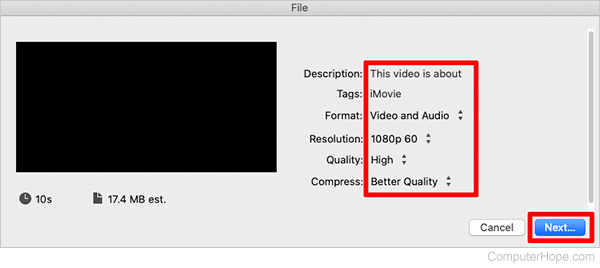
- Click File.
- Change the name of the Description.
- Change the Resolution to 1080p 60.
- Change the Quality to High.
- Change the Compress to Better Quality.
- Click Next.
- Change the Save as to the name of your video.
- Change the location to where you want to save the video.
If you want the video to be 30 frames per second, continue with the following steps. If you are happy with the video's duration and look, you are finished.
- Import the video you made into iMovie.
- Clear the existing timeline by clicking in the timeline, pressing Command+A, then click Delete. Or press Command+A to select all, and right-click, and Delete.
- Drag-and-drop the video you imported into the timeline.
- In the top-right box, click the speed wheel.
- Change the Speed to Custom.
- For 30 frames per second video, change the % to 300. Other options include 240%-24 FPS (Frames Per Second) and 600%-60 FPS.

- Repeat steps 14 through 22 to save the video.
Time-lapse video using photos in Premiere Pro

To make a time lapse video using photos in Adobe Premiere Pro, follow the steps below.
- Open Premiere Pro.
- Click File, New, Project.
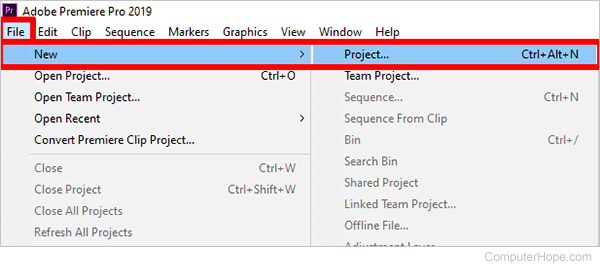
- Enter the name of your project and click OK.
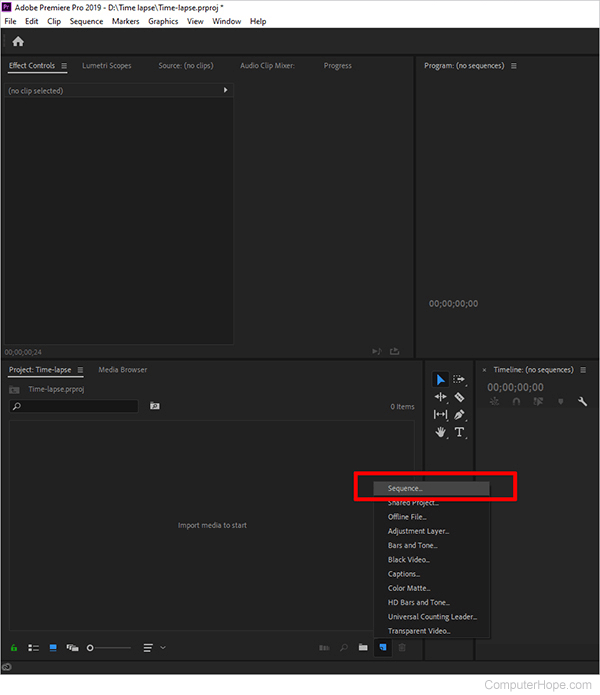
- In the project media tab in the bottom-left corner, click the icon that looks like a piece of paper with the corner folded. Then, click Sequence.
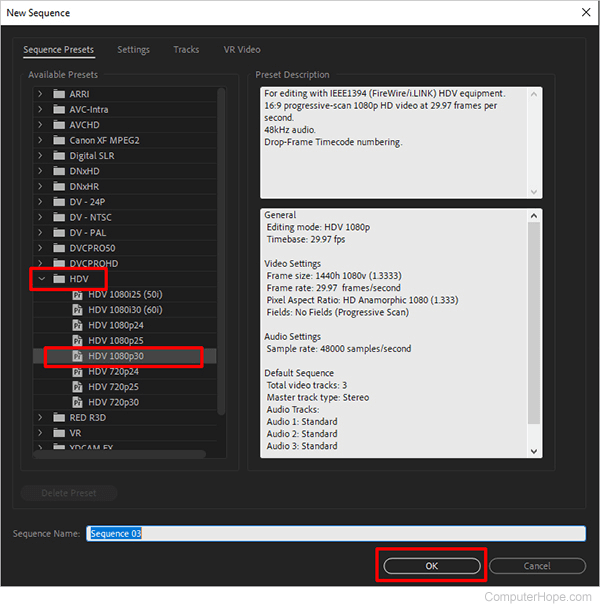
- In the New Sequence window, under Sequence Presets, click HDV, and then HDV 1080p30. This option formats the time-lapse to have 30 frames per second. Click OK.
- A box labeled Sequence 01 appears. In the media box, right-click anywhere in the blank space and choose Import.
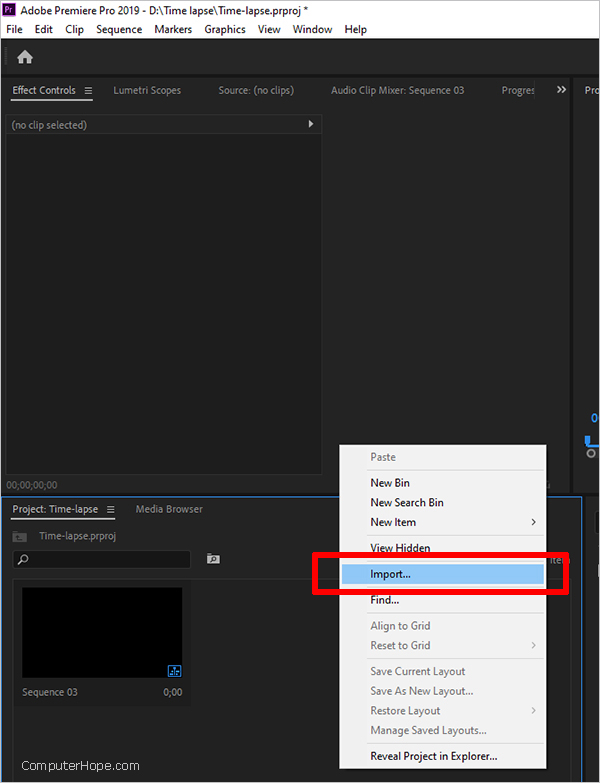
The next steps are critical. Follow steps 7 through 9 below very carefully.
- Click the first image you want to use.
- At the bottom, check the box next to Image Sequence to include all like images in a sequence, and make a single Premiere Pro sequenced file.
- Click Open.
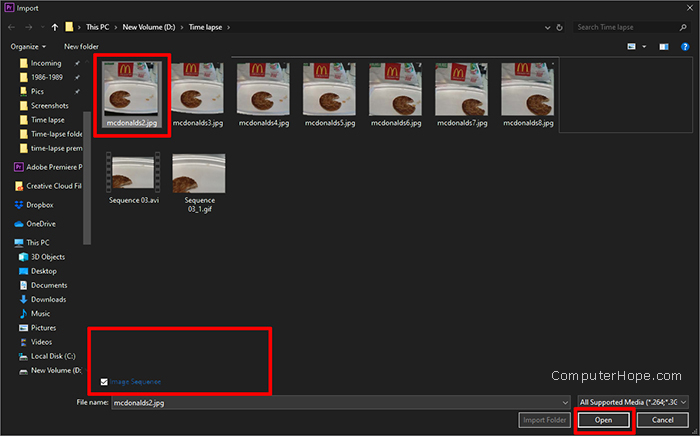
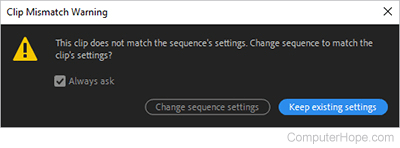
- Take the sequence you imported, and move it to the timeline in Premiere Pro.
- In the pop-up window, click Keep Existing Settings.
- Right-click the footage in the timeline, and click Scale to Frame Size.
- Make any needed changes, if desired.
- Click Play, and the time-lapse begins.
- Once you're satisfied with the time-lapse, click File, Export, Media.
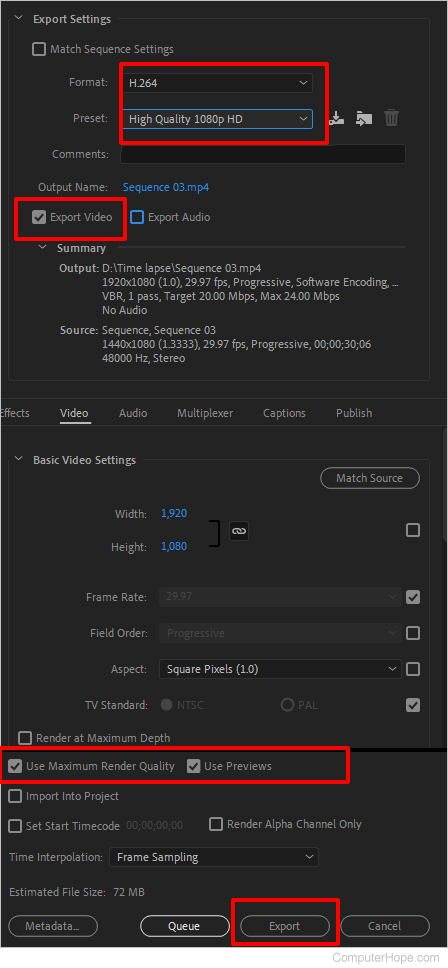
- Change the Format to H.264.
- Change the Preset to HD 1080p 29.97, if you have the option, or High-Quality 1080p HD.
- Check the boxes for Use Maximum Render Quality and Use Previews.
- Uncheck the box for Export Audio. This action changes the preset to Custom, which is okay.
- Click Output name to change the video's name, and choose the location to save the video.
- Click Export.

Time-lapse video using video footage in iMovie

There isn't a way to make a time-lapse from a video in iMovie. However, the following steps walk you through how to speed up a video, making the result similar to a time-lapse.
- Open iMovie.
- Click Import Media.

- Select the location of the video you want to use.
- Click Import Selected.
- Click-and-drag the imported video into the timeline.
- Click the video in the timeline.
- Near the top-right of the screen, click the speed icon.
- Choose the speed. 8x takes a 4-minute video down to 30 seconds.
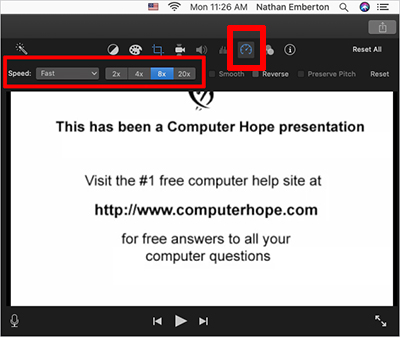
To keep the sped up sound with your video, you are now finished. Continue with the steps below to delete the sound from your video.
- Right-click the video footage in the timeline.
- Click Detach Audio.
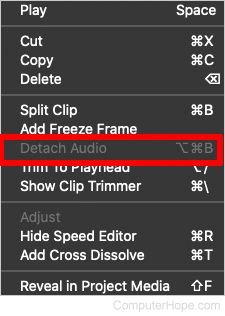
- Once the audio is detached, click the audio frame and delete it.
Time-lapse video using video footage in Premiere Pro

To make a time lapse video using video footage in Adobe Premiere Pro, follow the steps below.
- Open Premiere Pro.
- Click File, New.
- Name the project as desired, then click OK.
- In the bottom-left corner, import your video by right-clicking the empty box and selecting Import.

- Choose the location of the video and click Import.
- Move the video from the import location into the timeline.
- Click Keep Existing Settings.

- Right-click the footage in the timeline and select Scale to Frame Size.
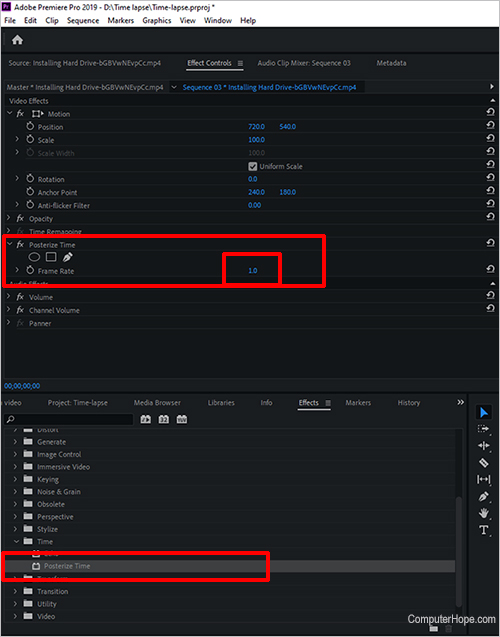
- Go to Effects, Video Effects, Stylize, Time, Posterize Time.
- Click-and-drag Posterize Time onto the video in the timeline.
- Go to Effect controls.
- Click the Frame Rate.
- Change the Frame Rate to 1, press Enter.
- Right-click the video in the timeline.
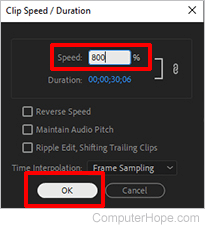
- Click Speed/Duration.
- Change the speed to 800%, then click OK. This takes a 4-minute video down to approximately 30 seconds.
- Click Play, and the time-lapse begins.
- Once you're satisfied with the time-lapse, click File, Export, Media.
- Change the Format to H.264.
- Change the Preset to HD 1080p 29.97, if you have the option, or High-Quality 1080p HD.
- Check the boxes for Use Maximum Render Quality and Use Previews.
- Uncheck the box for Export Audio.
- Click Output name to change the name of the video, and choose the location to save the video.
- Click Export.
