How to add or remove a cell, column, or row in Excel

Below is information about how to add and remove a blank cell, column, or row in a Microsoft Excel spreadsheet.
Adding a cell
When adding a new cell, data around the cell is moved down or to the right depending on how it's shifted. If there is data in adjacent cells that line up with the selected cell, it becomes unaligned. In some situations, it may be better to add a new column or add a new row instead of a new cell.
To add a new individual cell to an Excel spreadsheet, follow the steps below.
- Click the location where you want to insert a new cell.
- Right-click the selected cell and select Insert in the right-click menu.
- To insert a cell and move the current one to the right, choose the Shift cells right or Cells & Shift Right option.
To insert a cell and move the current one down, choose the Shift cells down or Cells & Shift Down option.
Removing a cell
When removing a cell, data around the cell is moved up or to the left depending on how it's shifted. If there's data in adjacent cells that line up with the selected cell, it becomes non-aligned.
To remove a cell from an Excel spreadsheet, follow the steps below.
- Right-click the cell you want to remove.
- In the pop-up menu, select Delete.
- Select the Shift cells left or Cells & Shift Left option to move the right-adjacent cell to the left when deleting the selected cell.
Select the Shift cells up or Cells & Shift Up option to move the below-adjacent cell up when deleting the selected cell.
Adding a row
To insert a new row in an Excel spreadsheet, select your version of Excel in the list below and follow the steps.
Excel Online (web version)
- Select the cell where you want to add a row. For example, to add a row on the '3' row, select the A3 cell or any other cell in row 3.
- Right-click the selected cell, select Insert, then select the Sheet Rows option.
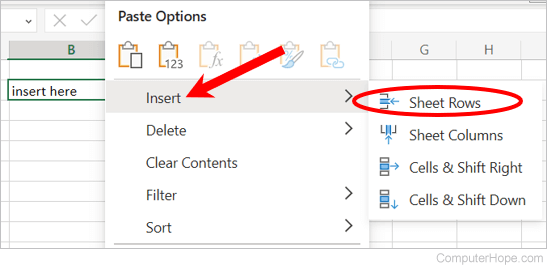
To add multiple rows at once, highlight more than one row, then right-click, select Insert and then Sheet Rows. For example, to add four rows beginning at row 3, highlight a cell in row 3 and the three cells below it. Then, follow the steps to insert the new rows.
Excel 2007 to Excel 365
- Select the cell where you want to add a row. For example, to add a row on the '3' row, select the A3 cell or any other cell in row 3.
- On the Home tab in the Ribbon menu, click Insert and select Insert Sheet Rows. You can also right-click the selected cell, select Insert, then select the Entire row option.
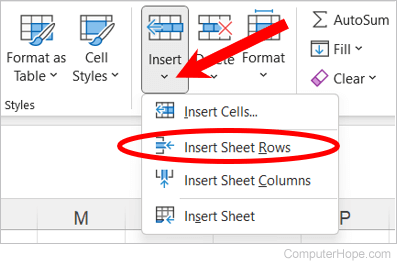
To add multiple rows at once, highlight more than one row, then click Insert and select Insert Sheet Rows. For example, to add four rows beginning at row 3, highlight row 3 and the three rows following it. Do this by clicking and dragging your mouse on the number 3, 4, 5, and 6. Then, follow the steps to insert the new rows.
Excel 2003 and earlier
- Select the cell where you want to add a row. For example, to add a row on the '3' row, select the A3 cell or any other cell in row 3.
- In the menu bar, click Insert and select Rows. This option won't be available if you're highlighting columns and not rows.
To add multiple rows at once, highlight more than one row and click Insert and select Rows. For example, to add four rows beginning at row 3, highlight row 3 and the three rows following it. Do this by clicking and dragging your mouse on the number 3, 4, 5, and 6. Then, follow the steps to insert the new rows.
Removing a row
To delete a row in an Excel spreadsheet, select your version of Excel in the list below and follow the steps.
Excel Online (web version)
- Select a cell in the row you want to delete.
- Right-click the selected cell, select Delete, and then the Sheet Rows option.
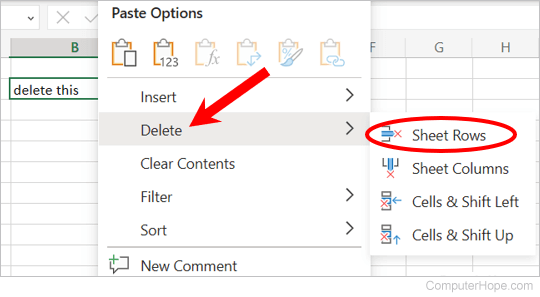
Using these steps, delete the row and move the rows under the deleted row up. To delete the contents of the row, press Delete on the keyboard.
Excel 2007 to Excel 365
- Highlight the row you want to delete.
- On the Home tab in the Ribbon menu, click Delete and select Delete Sheet Rows. You can also right-click the highlighted row and select Delete.
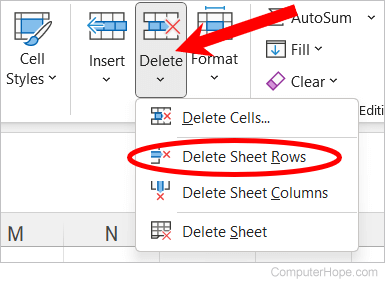
Using the steps above, delete the row and move the rows under the deleted row up. To delete the contents of the row, press Delete on the keyboard.
Excel 2003 and earlier
- Highlight the row you want to delete.
- In the menu bar, click Edit and select Delete. You can also right-click with your mouse on the highlighted row and select Delete.
Using these steps, delete the row and move the rows under the deleted row up. To delete the contents of the row, press Delete on the keyboard.
Adding a column
To insert a new column in an Excel spreadsheet, select your version of Excel in the list below and follow the steps.
Excel Online (web version)
- Select the cell where you want to add a column. For example, to add a column on the 'C' column, select the C1 cell or another cell in column C.
- Right-click the selected cell, select Insert, then select the Sheet Column option.
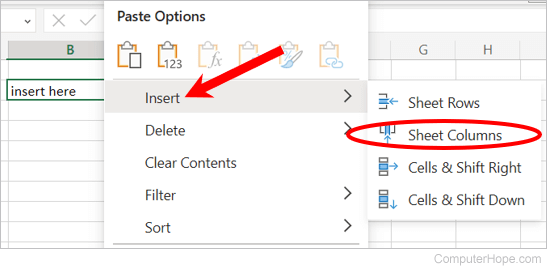
To add multiple columns at once, select a cell in each column, then right-click, select Insert and then Sheet Columns. For example, to add four rows on column C, select a cell in the C column. Then, additionally select a cell in the three columns to the right. Alternatively, with a cell in column C selected, press and hold Shift and click a cell (in the same row) in the F column. Then, follow the steps to insert the new rows.
Excel 2007 and later
- Select the cell where you want to add a column. For example, to add a column on the 'C' column, select the C1 cell or any other cell in column C.
- On the Home tab in the Ribbon menu, click Insert and select Insert Sheet Columns. You can also right-click the selected cell, select Insert, then select the Entire column option.
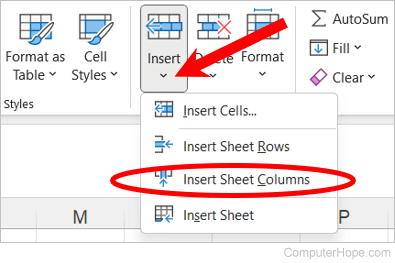
To add multiple columns at once, highlight more than one column, click Insert and select Insert Sheet Columns. For example, to add four rows on column C, highlight the C column. Then, additionally highlight the three columns to the right, by clicking and dragging on the C, D, E, and F letters. Alternatively, with column C highlighted, press and hold Shift and click the F column header. Then, follow the steps to insert the new rows.
Excel 2003 and earlier
- Select the cell where you want to add a column. For example, to add a column on the 'C' column, select the C1 cell or any other cell in column C.
- In the menu bar, click Insert and select Columns. This option is not available if you're highlighting rows and not columns.
To add multiple columns at once, highlight more than one column, click Insert and select Columns. For example, to add four rows on column C, highlight the C column. Then, additionally highlight the three columns to the right, by clicking and dragging on the C, D, E, and F letters. Alternatively, with column C highlighted, press and hold Shift and click the F column header. Then, follow the steps to insert the new rows.
Removing a column
To delete a column in an Excel spreadsheet, select your version of Excel in the list below and follow the steps.
Excel Online (web version)
- Select a cell in the column you want to delete.
- Right-click the selected cell, select Delete, and then the Sheet Columns option.
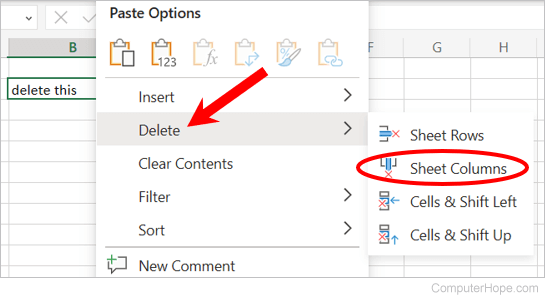
Using these steps, the column is deleted and the columns to the right are moved over to the left. To delete the contents of the column, press Delete on the keyboard.
Excel 2007 to Excel 365
- Highlight the column you want to delete.
- On the Home tab in the Ribbon menu, click Delete and select Delete Sheet Columns. You can also right-click the highlighted column and select Delete.
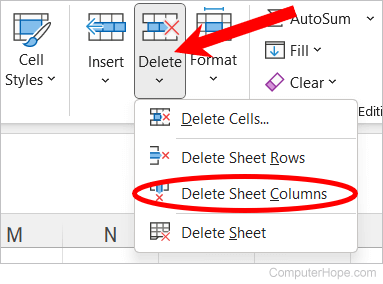
Using these steps, the column is deleted and the columns to the right are moved over to the left. To delete the contents of the column, press Delete on the keyboard.
Excel 2003 and earlier
- Highlight the column you want to delete.
- In the menu bar, click Edit and select Delete. You can also right-click with your mouse on the highlighted column and select Delete.
Using these steps, the column is deleted and the columns to the right are moved over to the left. To delete the contents of the column, press Delete on the keyboard.
